[django] 期限切れのセッションにアクセスすると
saveした時点でセッションが増えます.
期限切れのセッションは、定期的に削除するようにしましょう.
« 2012年09月 | メイン | 2013年09月 »
saveした時点でセッションが増えます.
期限切れのセッションは、定期的に削除するようにしましょう.
Paginatorの確認
def test001(request):
'''ページネーターの動作確認'''
objects = ['john', 'paul', 'george', 'ringo']
p = Paginator(objects, 2)
try:
page1 = p.page(3)
except EmptyPage, e:
print e
page1 = p.page(1)
c = dict(
has_next=page1.has_next(),
has_previous=page1.has_previous(),
has_other_pages=page1.has_other_pages(),
next_page_number=page1.next_page_number(),
previous_page_number=page1.previous_page_number(),
start_index=page1.start_index(),
end_index=page1.end_index(),
object_list=page1.object_list,
number=page1.number,
test=None,
)
c = simplejson.dumps(c, sort_keys=True, indent=2 * ' ')
return HttpResponse(c, mimetype='application/json')
すべてのページをjsonにする
def test002(request):
'''ページネーターの動作確認'''
objects = ['john', 'paul', 'george', 'ringo', 'yyy']
p = Paginator(objects, 2)
pageRange = p.page_range
cc = {}
for ipage in pageRange:
page1 = p.page(ipage)
c = dict(
has_next=page1.has_next(),
has_previous=page1.has_previous(),
has_other_pages=page1.has_other_pages(),
next_page_number=page1.next_page_number(),
previous_page_number=page1.previous_page_number(),
start_index=page1.start_index(),
end_index=page1.end_index(),
object_list=page1.object_list,
number=page1.number,
test=None,
)
cc[ipage] = c
ccJson = simplejson.dumps(cc, sort_keys=True, indent=2 * ' ')
return HttpResponse(ccJson, mimetype='application/json')
activity indicatorのjavascriptを修正する
- document.styleSheets[0].insertRule(rule);
+ document.styleSheets[0].insertRule(rule, document.styleSheets[0].cssRules.length);
Rのforステートメントは激しく遅いので有名です.この繰り返しをpython側でやっちゃったらどうなるかなっと
# R内で直接まわす
now = datetime.datetime.now()
robjects.r('nn <- 100000;for( ii in 1:nn ){ x <- 4}')
print datetime.datetime.now() - now# pythonでまわす ①
func = robjects.r('function(x) x <- 4')
now = datetime.datetime.now()
for ii in range(100000):
tmp = func(4.0)print datetime.datetime.now() - now
# pythonでまわす ②
func = robjects.r('func <- function(x) x <- 4')
print robjects.r.func
now = datetime.datetime.now()
for ii in range(100000):
tmp = robjects.r.func(4.0)print datetime.datetime.now() - now
>
何をしているのか、そのうち思い出します
import rpy2.rinterface as ri
ri.initr()
eval = ri.baseenv["eval"]
expression = ri.parse('x <- 4')# pythonでまわす ①
now = datetime.datetime.now()
for ii in range(100000):
tmp = eval(expression)print datetime.datetime.now() - now
>
parseを使ってみる.
import rpy2.rinterface as ri
ri.initr()
expression = ri.parse('1 + 2')
len(expression)
len(expression[0])
ri.str_typeint(expression[0][0].typeof)
'SYMSXP'
tuple(expression[0][1])
(1.0,)
tuple(expression[0][2])
(2.0,)
>>> ri.baseenv["eval"]
>>> eval = ri.baseenv["eval"]
>>> eval(expression)
>>> print eval(expression)
>>> eval(expression)[0]
3.0
>>> print eval(expression)[0]
3.0
>>> print eval(expression)[1]
Traceback (most recent call last):
File "", line 1, in
IndexError: Index out of range.
>>> print eval(expression)[0]
3.0
>>> expression = ri.parse('3 + 2')
>>> print eval(expression)[0]
5.0
>>> print eval(expression)
<rpy2.rinterface.SexpVector - Python:0xb7fae1c0 / R:0x86da7b0>
>>> tuple(eval(expression))
(5.0,)
Pass-by-value paradigmという、内容が良くわからなかった.
An infamous example is when the column names for a matrix are changed, bringing a system to its knees when the matrix is very large, as the whole matrix ends up being copied
あまりにも悪名高い振る舞いが、matrixオブジェクトのカラム名を変更しようとするときである.Rはmatrixオブジェクトのすべてをコピーしようとするため、matrixが非常に大きい場合、システムが崩壊する.
以下のようにデータを付値すると、リストになってしまう.
>>> robjects.globalenv["a"] = [3,2,1]
>>> print robjects.r.a
[[1]]
[1] 3[[2]]
[1] 2[[3]]
[1] 1
>>> print robjects.IntVector([3,2,1])
[1] 3 2 1>>> robjects.globalenv["a"] = robjects.IntVector([3,2,1])
>>> print robjects.r.a
[1] 3 2 1>>> print robjects.r('a')
[1] 3 2 1>>> print robjects.r('a[1]')
[1] 3
>>> robjects.Vector([3,2,1]).r_repr()
'list(3L, 2L, 1L)'
>>> tmp = robjects.Vector([3,2,1]).r_repr()
>>> tmp
'list(3L, 2L, 1L)'
>>> robjects.r('a <- %s' % tmp)
>>> print robjects.r('a')
[[1]]
[1] 3[[2]]
[1] 2[[3]]
[1] 1
import datetime
testdata = range(100000,0,-1)
roInt = robjects.IntVector(testdata)
now = datetime.datetime.now()
tmp = roInt.r_repr()
robjects.r('a <- %s' % tmp)
print datetime.datetime.now() - nownow = datetime.datetime.now()
robjects.globalenv["a"] = roInt
print datetime.datetime.now() - now
>
RをPythonに組み込むことができる.それにインターフェースもちゃんとしてる.こいつはクールだぜ.
>>> import rpy2.robjects as robjects
>>> robjects.r
<rpy2.robjects.R object at 0xa189ccc>
>>> print robjects.r
<rpy2.robjects.R object at 0xa189ccc>
platform: i686-pc-linux-gnu
arch: i686
os: linux-gnu
system: i686, linux-gnu
status:
major: 2
minor: 15.1
year: 2012
month: 06
day: 22
svn rev: 59600
language: R
version.string: R version 2.15.1 (2012-06-22)
nickname: Roasted Marshmallows
>>> robjects.r.pi
<FloatVector - Python:0xa189e0c / R:0xaa2dff0>
[3.141593]
>>> robjects.r.pi[0]
3.141592653589793
>>> robjects.r.letters
<StrVector - Python:0xa19228c / R:0xa87e2a0>
['a', 'b', 'c', ..., 'x', 'y', 'z']
>>> robjects.r.letters[0:]
<StrVector - Python:0xa19290c / R:0xa87e3d0>
['a', 'b', 'c', ..., 'x', 'y', 'z']
>>> robjects.r.letters[0]
'a'
>>> robjects.r.letters[1]
'b'
>>> robjects.r('pi')
<FloatVector - Python:0xa192aec / R:0xaa2dff0>
[3.141593]
>>> robjects.r('x <- 4')
<FloatVector - Python:0xa192e6c / R:0xaa2ddd0>
[4.000000]
>>> robjects.r('x')
<FloatVector - Python:0xa192dec / R:0xaa2ddd0>
[4.000000]
>>> robjects.r['x']
<FloatVector - Python:0xa1929ec / R:0xaa2ddd0>
[4.000000]
>>> [ee for ee in robjects.r.letters]
['a', 'b', 'c', 'd', 'e', 'f', 'g', 'h', 'i', 'j', 'k', 'l', 'm', 'n', 'o', 'p', 'q', 'r', 's', 't', 'u', 'v', 'w', 'x', 'y', 'z']
urlpatterns = patterns('', (r'^publishers/$', ListView.as_view( model=Publisher, context_object_name="publisher_list", )), )
However, there is; you can subclass DetailView and provide your own implementation of the get_context_data method. The default implementation of this that comes with DetailView simply adds in the object being displayed to the template, but you can override it to show more:
でもDetailViewをサブクラス化して、「get_context_data」メソッドをオーバーライドすれば可能だよ.
from django.views.generic import DetailView
from books.models import Publisher, Bookclass PublisherDetailView(DetailView):
context_object_name = "publisher"
model = Publisherdef get_context_data(self, **kwargs):
# Call the base implementation first to get a context
context = super(PublisherDetailView, self).get_context_data(**kwargs)
# Add in a QuerySet of all the books
context['book_list'] = Book.objects.all()
return context
modelsに基づく汎用ビュー
# models.py
from django.db import modelsclass Publisher(models.Model):
name = models.CharField(max_length=30)
address = models.CharField(max_length=50)
city = models.CharField(max_length=60)
state_province = models.CharField(max_length=30)
country = models.CharField(max_length=50)
website = models.URLField()class Meta:
ordering = ["-name"]def __unicode__(self):
return self.nameclass Book(models.Model):
title = models.CharField(max_length=100)
authors = models.ManyToManyField('Author')
publisher = models.ForeignKey(Publisher)
publication_date = models.DateField()
from django.conf.urls.defaults import *
from django.views.generic import ListView
from books.models import Publisherurlpatterns = patterns('',
(r'^publishers/$', ListView.as_view(
model=Publisher,
)),
)
{% extends "base.html" %}{% block content %}
Publishers
{% for publisher in object_list %}
- {{ publisher.name }}
{% endfor %}
{% endblock %}
Class-based generic views (and any class-based views that inherit from the base classes Django provides) can be configured in two ways: subclassing, or passing in arguments directly in the URLconf.
クラスベースの汎用ビューは2つの方法で設定できる.サブクラス化するか、またはURLconfの中で直接引数を渡すか、である.
# some_app/views.py
from django.views.generic import TemplateViewclass AboutView(TemplateView):
template_name = "about.html"
# urls.py
from django.conf.urls.defaults import *
from some_app.views import AboutViewurlpatterns = patterns('',
(r'^about/', AboutView.as_view()),
)
from django.conf.urls.defaults import *
from django.views.generic import TemplateViewurlpatterns = patterns('',
(r'^about/', TemplateView.as_view(template_name="about.html")),
)
1.3では汎用ビューがクラスになったそうで.今までは関数で実装されていたのは削除されたらしい.これでどういう便利さをもたらしたのかを検証してみたい.(続きはそのうち・・・)
This is one of the reasons generic views were redesigned for the 1.3 release - previously, they were just view functions with a bewildering array of options; now, rather than passing in a large amount of configuration in the URLconf, the recommended way to extend generic views is to subclass them, and override their attributes or methods.
汎用ビューは1.3リリースで再実装された.以前はなにがなんだか訳がわからないオプションのビュー関数のみであったのだが.今はむしろ多くの設定をURLconfに書いて渡せるし、汎用ビューを拡張する良い方法が、それらをサブクラス化し属性またはメソッドをオーバーライドすることである.(適当訳)
まずはPythonをインストールしましょう.Djangoは、Pythonのバージョン2.5~2.7に対応しています.この時、sqlite3もビルド出来ているか確認します.zlibもyumで前もってインストールしておきましょう.
出来ていない場合は「./configure LDFLAGS='-L/path/to/lib' CPPFLAGS="-I/path/to/include'」あたりを考えてみましょう.(参考:「Building python 2.6 w/ sqlite3 module if sqlite is installed in non-standard location」「2.7.3: sqlite module does not build on centos 5 and Mac OS X 10.4」.結局「」を修正するはめに)
./configure --prefix='/opt/python2.7.3' LDFLAGS='-L/usr/lib' CPPFLAGS="-I/usr/include" CFLAGS="-I/usr/include"
次にDjangoをインストールします.ダウンロードしてきてインストールしたPythonでsetup.pyします.hashlibをインストールするときもこのようにインストールしたいPythonのバージョンで「setup.py」してください.
/opt/python2.7.3/bin/python2.7 setup.py build
(suして)/opt/python2.7.3/bin/python2.7 setup.py install
import django
/opt/python2.7.3/bin/python2.7 /opt/python2.7.3/lib/python2.7/site-packages/django/bin/django-admin.py startproject mysite1_4
この後のアプリケーションの作成とかはこの「mysite1_4」フォルダの中に作成された「manage.py」でできますので、めんどくさいのはここだけです.
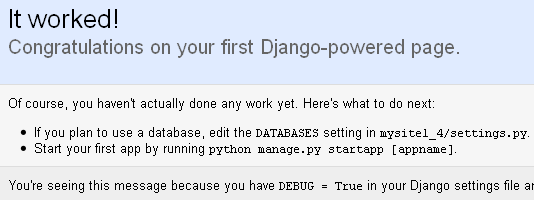
ここでエラーが無くプロジェクトが作成されたら、Djangoのインストールは成功しているといってよいと思います.
後でこの「mysite1_4」はrootにオーナーを変更するか、/var/wwwあたりにコピーしてそちらで運用することになりますが、今はここでよいでしょう.
Djangoを起動してみましょう.「cd mysite1_4」して「mysite1_4」ディレクトリに入ります.
/opt/python2.7.3/bin/python2.7 manage.py runserver (このマシンのホスト名):8000
Djangoの稼動確認が終わったところで、mod_wsgiをインストールします.apacheもインストールしておいてください.apacheのdevelもインストールしましょう.インストールしておかないとなにやらapxsが無いとか怒られますし.
mod_wsgiのソースをダウンロード・解凍します.以下のようにしてmod_wsgiをインストールします.
./configure --with-python=/opt/python2.7.3/bin/python2.7
make
(suして)make install
以下のように「/etc/httpd/conf/httpd.conf」を設定します.
LoadModule wsgi_module modules/mod_wsgi.so
Alias /static/ /var/www/Django14/static/
<Directory /var/www/Django14/static>
Order deny,allow
Allow from all
</Directory>WSGIDaemonProcess example.com python-path=/var/www/Django14 processes=5 threads=1
WSGIScriptAlias / /var/www/Django14/mysite1_4/wsgi.py
WSGIPythonPath /var/www/Django14<Directory /var/www/Django14/mysite1_4>
<Files wsgi.py>
Order deny,allow
Allow from all
</Files>
</Directory>
import os, sys
sys.path.append('/usr/local/django')
os.environ['DJANGO_SETTINGS_MODULE'] = 'mysite.settings'import django.core.handlers.wsgi
application = django.core.handlers.wsgi.WSGIHandler()
追記:
Djangoのsettings.pyのtimezone設定を「Asia/Tokyo」にしないとapacheのaccess.logの時間も日本時間になりません.
追記2:
staticは以下のような感じでシンボリックリンクを
ln -s /opt/python2.7.3/lib/python2.7/site-packages/django/contrib/admin/static/admin admin